Raspberry Pi SSH setup is an essential process for anyone looking to manage their Raspberry Pi remotely. Whether you're a beginner or an advanced user, understanding how to configure SSH on your Raspberry Pi can significantly enhance your productivity and flexibility. This guide will walk you through everything you need to know to set up SSH securely and effectively.
In today's digital world, remote access to devices has become a necessity. With the rise of IoT and home automation, Raspberry Pi has emerged as a popular choice for hobbyists and professionals alike. One of the most powerful features of Raspberry Pi is its ability to allow remote access through SSH, enabling users to control their devices from anywhere in the world.
This article aims to provide a detailed and practical guide to Raspberry Pi SSH setup, ensuring that even beginners can confidently configure their systems. By following the steps outlined here, you'll be able to establish secure remote connections and take full advantage of your Raspberry Pi's capabilities.
Read also:Kelly Jane Caron The Rising Star Of Hollywood
Table of Contents
- Introduction to Raspberry Pi SSH Setup
- What is SSH?
- Why Use SSH for Raspberry Pi?
- Prerequisites for RPI SSH Setup
- Enabling SSH on Raspberry Pi
- Connecting to Raspberry Pi via SSH
- Securing Your Raspberry Pi SSH Connection
- Troubleshooting Common Issues
- Advanced SSH Configurations
- Conclusion and Next Steps
Introduction to Raspberry Pi SSH Setup
Raspberry Pi SSH setup is a fundamental skill for anyone working with this versatile device. SSH, or Secure Shell, allows users to securely access and control their Raspberry Pi remotely. Whether you're managing a home server, automating tasks, or developing software, SSH provides a reliable way to interact with your device without needing physical access.
This section will explore the basics of SSH and its importance in modern computing. Understanding the principles behind SSH will help you appreciate why it's a critical tool for Raspberry Pi users. Additionally, we'll discuss the benefits of using SSH over other remote access methods.
What is SSH?
SSH, or Secure Shell, is a cryptographic network protocol that facilitates secure communication between two devices over an unsecured network. It is widely used for remote command-line login and data transfer. SSH ensures that all data transmitted between the client and server is encrypted, protecting it from unauthorized access and interception.
Key Features of SSH
- Encryption: SSH encrypts all data transmitted between the client and server, ensuring privacy and security.
- Authentication: Users must authenticate themselves before gaining access to the server, typically using passwords or public key authentication.
- Integrity: SSH ensures that data is not altered during transmission by verifying its integrity.
Why Use SSH for Raspberry Pi?
Using SSH for Raspberry Pi offers several advantages that make it an indispensable tool for remote management:
- Remote Access: SSH allows you to control your Raspberry Pi from anywhere, as long as you have an internet connection.
- Security: SSH encrypts all communication, protecting your data from eavesdropping and unauthorized access.
- Efficiency: SSH eliminates the need for physical access, saving time and effort when managing multiple devices.
By leveraging SSH, you can perform tasks such as file transfers, system updates, and software installations remotely, making it a valuable asset for both personal and professional projects.
Prerequisites for RPI SSH Setup
Before diving into the Raspberry Pi SSH setup process, ensure you have the following prerequisites in place:
Read also:How Tall Is Shaq In Metres A Comprehensive Guide To Shaqs Height And More
- Raspberry Pi Device: Any model of Raspberry Pi will work, provided it is running a compatible operating system.
- Operating System: Raspberry Pi OS (formerly Raspbian) is the most commonly used OS for this purpose.
- Network Connection: Ensure your Raspberry Pi is connected to the internet via Ethernet or Wi-Fi.
- SSH Client: Install an SSH client on your computer, such as PuTTY (for Windows) or the built-in terminal (for macOS and Linux).
Having these prerequisites in place will ensure a smooth setup process and minimize potential issues.
Enabling SSH on Raspberry Pi
To enable SSH on your Raspberry Pi, follow these simple steps:
Method 1: Using Raspberry Pi Configuration
- Open the Raspberry Pi Configuration tool by typing
sudo raspi-configin the terminal. - Navigate to the "Interfacing Options" menu and select "SSH."
- Choose "Enable" and reboot your Raspberry Pi to apply the changes.
Method 2: Creating an SSH File
If you're setting up SSH for the first time, you can enable it by creating an empty file named "ssh" on the boot partition of your SD card:
- Insert the SD card into your computer and locate the boot partition.
- Create a new file named "ssh" (no extension) in the root directory of the boot partition.
- Insert the SD card back into your Raspberry Pi and power it on. SSH will be automatically enabled.
Connecting to Raspberry Pi via SSH
Once SSH is enabled, you can connect to your Raspberry Pi from another device using an SSH client. Follow these steps:
- Determine the IP address of your Raspberry Pi by running
hostname -Iin the terminal. - Open your SSH client and enter the IP address of your Raspberry Pi as the hostname.
- Log in using the default username "pi" and password "raspberry" (if not changed).
For added security, consider changing the default password immediately after connecting.
Securing Your Raspberry Pi SSH Connection
While SSH is inherently secure, taking additional steps can further protect your Raspberry Pi from unauthorized access:
- Change Default Credentials: Update the default username and password to something unique and strong.
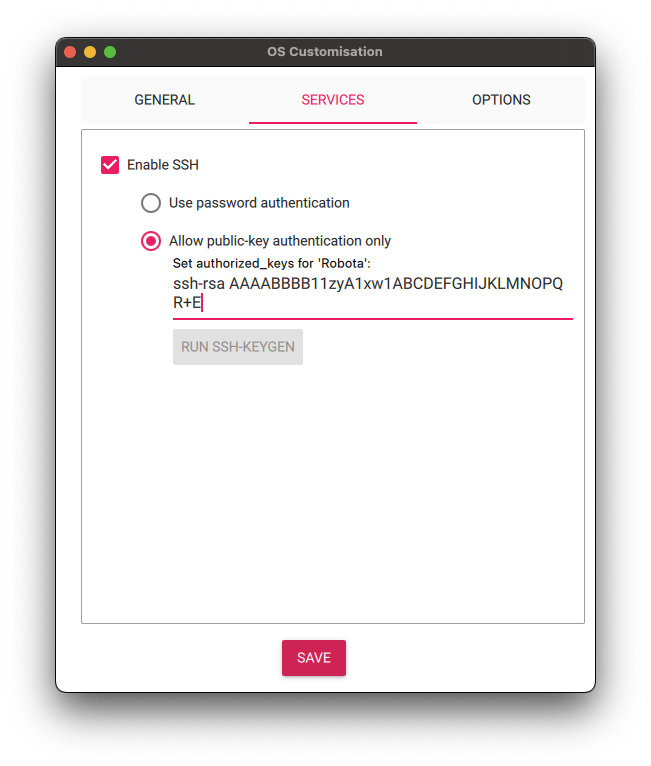
- Use Public Key Authentication: Disable password-based login and use SSH keys for authentication.
- Disable Root Login: Prevent direct login as the root user to reduce the risk of unauthorized access.
- Update Regularly: Keep your Raspberry Pi OS and SSH software up to date to patch any vulnerabilities.
Implementing these security measures will ensure that your Raspberry Pi remains protected against potential threats.
Troubleshooting Common Issues
Despite careful setup, issues may arise when configuring SSH on your Raspberry Pi. Below are some common problems and their solutions:
- Connection Refused: Ensure SSH is enabled and the Raspberry Pi is connected to the network.
- Incorrect Credentials: Double-check the username and password or verify SSH key permissions.
- Firewall Blocking: Check your firewall settings to ensure SSH traffic is allowed.
If you encounter persistent issues, consult the official Raspberry Pi documentation or seek assistance from online forums.
Advanced SSH Configurations
For advanced users, SSH offers a range of customization options to enhance functionality and security:
Configuring SSH Tunnels
SSH tunnels allow you to securely forward traffic between your local machine and a remote server. This can be particularly useful for accessing services behind firewalls or encrypting unsecured connections.
Setting Up Port Forwarding
Port forwarding enables you to access your Raspberry Pi from outside your local network. While convenient, this requires careful configuration to maintain security.
By exploring these advanced configurations, you can unlock the full potential of SSH on your Raspberry Pi.
Conclusion and Next Steps
Raspberry Pi SSH setup is a straightforward yet powerful process that opens up a world of possibilities for remote management and automation. By following the steps outlined in this guide, you can confidently configure SSH on your Raspberry Pi and secure your connections against potential threats.
We encourage you to experiment with the advanced configurations discussed and explore additional resources to deepen your understanding of SSH. Don't forget to share your experiences and insights in the comments below, and consider exploring other articles on our site for more Raspberry Pi tips and tricks.
Thank you for reading, and happy tinkering!